Launch Your Paid Framer Component Library: From Design to $5K MRR in 60 Days
Launch a paid Framer component library in 60 days using a validation-first system that minimizes wasted build time and maximizes early revenue. You'll identify real demand in the Framer ecosystem, build 40-60 production-ready components using repeatable patterns (variants, CMS, responsiveness), then package, price, and launch with a proven freemium-to-paid funnel designed to reach your first 150-250 customers.

You've built a dozen Framer sites for clients, but your bank account resets to zero every month. While you're trading hours for dollars, other designers with your exact same skills are pulling $5K monthly from component libraries they built once and sell on repeat. This is the step-by-step system that gets you from "I should probably build something" to your first $5K month in 60 days--no coding, no guesswork, no launching into the void and praying.
What Students Say
Hear from learners who have completed this course:
Tomás R.
Freelance Framer Developer & UI Contractor
I’d built random Framer components before, but Section 2 (Demand Research) is what changed everything. I followed the “component gap” process and pulled ideas directly from Framer Community posts + template comments, then ranked them by urgency and repeat requests. That gave me a tight scope instead of a giant wishlist. In Section 4, the emphasis on repeatable patterns (variants + responsiveness rules) helped me build 52 components in about 5 weeks without the usual spaghetti. The real win was Section 6: I launched a freemium pack with 12 components and a paid tier for the full library. Within 30 days I hit 176 customers and crossed $2.9K MRR—my first product revenue that didn’t depend on client hours.
Read more
Fatima A.
Growth Marketer at a B2B SaaS (solo marketing team)
I’m not a “designer by trade,” but we use Framer for landing pages and I was tired of reinventing sections every campaign. Section 5 (CMS + real website integration) was incredibly practical—learning how to structure components so they plug into CMS collections saved me from messy, one-off builds. I rebuilt our pricing page and resources index using the course’s architecture rules from Section 3, and now my team can ship new pages without breaking layout on mobile. The launch system in Section 7 also surprised me: I copied the outreach cadence (Framer Community + Twitter/X + newsletter) and used it to validate a mini component pack for our niche. Result: I cut page build time from ~6 hours to ~2 hours per landing page, and the pack brought in 63 paid users in the first month as a side project.
Read more
Adaeze O.
Product Designer at a Fintech Startup
The “validation-first” 60-day plan in Section 1 stopped me from overbuilding. I used the Day 1–7 framework to get a quick validation win: I shared Figma/Framer previews of a few key components (tables, dashboards, empty states) and collected feedback before I committed to building the whole set. Section 4’s workflow for building with variants (instead of duplicating components for every state) made my library feel coherent—hover/active/disabled states are finally consistent. Then Section 8 (post-launch optimization) helped me treat updates like a product: I added an update cadence, changelog, and retention-focused improvements. After launch, I went from 38 paying customers to 214 over two months and stabilized around $5.2K MRR, but the bigger impact is internal: our product UI is now faster to iterate and noticeably more consistent across web views.
Read more
Course Overview
Launch a paid Framer component library in 60 days using a validation-first system that minimizes wasted build time and maximizes early revenue. You'll identify real demand in the Framer ecosystem, build 40-60 production-ready components using repeatable patterns (variants, CMS, responsiveness), then package, price, and launch with a proven freemium-to-paid funnel designed to reach your first 150-250 customers.
Section 1: The 60-Day Plan and Your First Validation Win (Days 1-7)
You'll set your targets, define what "$5K MRR" means for your pricing model, and validate your first component category before building. This section front-loads quick wins: demand signals, a simple offer, and a pre-sell ready landing page.
Learning Outcomes:
- Choose a component library angle with clear buyer pain and strong demand signals (not just "cool components").
- Run fast community research using scripts, surveys, and outreach to confirm what people will pay for.
- Publish a landing page with an email waitlist and a clear positioning statement you can test immediately.
Most designers start their digital product journey backward. They spend three months perfecting a massive component library--polishing every pixel, obsessing over auto-layout settings, and crafting complex interactions--only to launch to the sound of crickets.
This is the "Build Trap." It is the primary reason talented designers fail to monetize their skills.
In this first section, we are flipping that script. You are not going to build a single component yet. Instead, you are going to spend your first seven days validating that a market actually exists for what you intend to build. By the end of this week, you will have a clear revenue target, a specific product angle, and a waiting list of interested buyers.

The 60-Day Roadmap: From Zero to Recurring Revenue
Before we dive into the micro-tactics of validation, you need to understand the macro-timeline. The goal of this course is not just to "launch something"; it is to build a sustainable asset that generates $5,000 in Monthly Recurring Revenue (MRR) or equivalent product sales.
Here is what your next two months look like:
- Days 1-7 (Current): Market Validation & Offer Design. Result: A waitlist of 50+ qualified leads.
- Days 8-28: The "Sprint Build." Creating your Minimum Viable Library (MVL).
- Days 29-45: Packaging, Licensing, and Logistics (Lemon Squeezy/Gumroad setup).
- Days 46-60: The Rolling Launch and Partner Outreach.
Key Insight: Most creators fail because they treat a component library like a client project. In client work, the client defines the value. In products, you must define the value proposition before you write a single line of code.
Reverse Engineering the $5K Goal
"Five thousand dollars a month" can feel abstract. To make it actionable, we need to break it down into unit economics. Your pricing strategy dictates your build strategy.
In the Framer ecosystem, there are generally three pricing tiers for component libraries. Choose the one that aligns with your goals for this 60-day sprint.
| Model | Price Point | Sales Needed for $5K | Complexity Required | Best For |
|---|---|---|---|---|
| Volume Play | $29 - $39 | ~140 sales/mo | Low (UI Kits, Basic Sections) | Designers with large social audiences (>10k followers). |
| Value Play | $69 - $99 | ~60 sales/mo | Med (Systems, Dashboards, SaaS) | The "Sweet Spot" for most designers. High perceived value. |
| Premium Play | $149+ | ~33 sales/mo | High (Full Logic, CMS Heavy) | Niche specialists (e.g., Real Estate or FinTech specific systems). |
For the majority of designers reading this, the Value Play is the safest route to success. Selling 60 units a month is significantly easier than selling 140, provided the components solve a specific, expensive problem.
Step 1: Finding Your "Pain-Killer" Angle
The Framer marketplace is flooded with "vitamins"--beautiful, artistic components that are nice to have but not essential. To reach $5K MRR quickly, you must build "pain-killers."
A pain-killer component solves a technical or design headache that costs other designers time and frustration.
Examples of "Vitamin" vs. "Pain-Killer" Angles:
- Vitamin: A set of 50 generic "Contact Us" forms. (Low value, easy to build yourself).
- Pain-Killer: A comprehensive "SaaS Dashboard System" with working charts, responsive data tables, and sidebar navigation logic. (High value, technically annoying to build).
- Vitamin: Animated hero headers.
- Pain-Killer: A "CMS-Powered Blog Suite" with search functionality, category filtering, and related post logic already hooked up.
Pro Tip: Look at your own "Recent Files" in Framer. What is the one thing you dread building for every client project? The thing that feels like a chore? That is your product opportunity. If you hate building it, other designers do too, and they will pay you $79 to never have to build it from scratch again.
Step 2: The "Lazy" Validation Script (Days 2-4)
Once you have a hypothesis (e.g., "I think people want a specialized library for Mobile App Landing Pages"), you need to verify it without building it. We use the "Lazy Research" method.
You are going to post on Twitter/X, LinkedIn, or in Discord communities (like the official Framer server or Memorisely). Do not ask "Would you buy this?" People will lie to be nice. Ask for input on the problem.
Use this template:
"I'm planning to build a dedicated Framer component system for [Target Audience: e.g., SaaS Founders].
I'm tired of re-building [Specific Pain Point: e.g., complex pricing tables with toggles] for every client.
Before I start, what's the one component that you always dread building from scratch?
- Data Tables
- Mega Menus
- Filtering Logic
Let me know below."
Why this works:
- It signals you are an active builder (authority).
- It asks for opinions, which people love to give.
- The responses tell you exactly what to include in your library to make it a "must-buy."
If you get zero engagement, your angle is boring. Pivot now. It's better to fail a tweet than to fail a product launch.
Step 3: The Pre-Sell Landing Page (Days 5-7)
By Day 5, you should have identified a winning angle based on community feedback. Now, you need to capture intent. You will build a one-page site in Framer.
This is not a full marketing site. It is a "Waitlist Page." It needs only three sections:
- The Promise (Hero): "The First Framer Component Library Dedicated to [Niche]."
- The Agitation (Features): Show 3-4 screenshots of "work in progress" designs (even if they are just Figma mockups). List the problems you are solving (e.g., "Stop wasting 5 hours on responsive navbars").
- The Call to Action: "Launching in [Month]. Join the waitlist for a 40% Early Bird discount."
The Trap to Avoid: Do not over-design this page. It should take you 4 hours max. Use a standard Framer template. The goal is not to win a design award; it is to get email addresses.
Important: Your metric for success is 50 email signups. If you cannot find 50 people interested in your product when it is free to sign up, you will not find customers when you ask for money. If you hit 50 signups, you have the "Green Light" to start building.
Summary of Week 1 Deliverables
By the end of Day 7, you should have:
- Selected a specific component category (e.g., "FinTech UI Kit").
- Determined your pricing tier (e.g., $79 one-time purchase).
- Validated the pain point via social or community posts.
- Published a waitlist page and collected your first batch of emails.
If you have these four things, you have already outperformed 90% of creators who just "start building." You are no longer guessing; you are executing on data.
Coming Up in Section 2: Now that we have demand, we need supply. In the next section, we will dive into "Systemizing the Build." You will learn how to set up a scalable Figma-to-Framer workflow that allows you to crank out high-quality components in half the time, ensuring you hit your launch deadline without burning out.
Section 2: Demand Research That Finds Component Gaps People Actually Buy
You'll build a repeatable research workflow across Framer Community, Twitter/X, and competitor teardowns to identify high-intent gaps. You'll leave with a prioritized build list and a confidence score for each component group.
Learning Outcomes:
- Extract "money keywords" and recurring requests from community posts, job threads, and template reviews.
- Build a ranked backlog of 50-100 component ideas using a scoring model (frequency, urgency, willingness-to-pay, differentiation).
- Create a clear Ideal Customer Profile and positioning wedge that separates you from existing libraries.
The biggest lie in the digital product space is "scratch your own itch." While solving your own problems is a decent starting point, it is not a business strategy. Just because you want a specific component doesn't mean 500 other people are willing to pull out their credit cards for it.
In Section 1, we established your 60-day timeline and secured a quick validation win. Now, we move from "gut feeling" to data.
Most designers skip this step. They rush into Figma, spend three weeks perfecting a navigation component, and then launch to crickets. We're going to invert that process. By the end of this section, you will have a prioritized backlog of high-intent component gaps--ideas that are statistically likely to sell before you design a single pixel.
The "Money Keyword" Framework
To find gaps, you must stop reading design communities like a consumer and start reading them like a detective. We are looking for High-Intent Signals.
A low-intent signal is admiration ("Wow, cool interaction!"). A high-intent signal is frustration or transaction ("Does anyone know a template that handles X?" or "I'm tired of trying to make Y work").
We are hunting for specific "Money Keywords" in community discussions. These are terms that imply a user has a budget and a deadline, but lacks a solution.
| Signal Type | Keywords to Search | What it Means for You |
|---|---|---|
| Urgency | "Deadline," "Stuck," "ASAP," "Broken" | The user needs a solution now and is less price-sensitive. |
| Transaction | "Hire," "Pay," "Budget," "Quote" | The user is already mentally prepared to spend money. |
| Deficiency | "Alternative to," "Lack of," "Too complex," "Can't find" | The current market leaders are failing this user segment. |
| Workflow | "Client handover," "CMS limits," "Localization," "Filtering" | These are high-value technical pain points, not just visual preferences. |
Pro Tip: Set up alerts for these keywords. Use tools like TweetDeck (X Pro) or saved searches in the Framer Community forum to monitor these terms weekly. You want to see the complaints as they happen.
The 3-Channel Research Workflow
You cannot rely on a single source of data. We triangulate demand using three specific channels.
1. The Framer Community (Technical Blockers)
Go to the official Framer Community and filter by "Support" or "Requests." You aren't looking for the easy questions. You're looking for the recurring technical headaches.
If you see five posts in one month asking "How do I create a multi-step form with logic?", that is not a support ticket; that is a product opportunity. Users are struggling to build it themselves, which means they will pay $29-$49 to simply drag and drop a pre-built solution.
2. Twitter/X (Status & Trends)
Twitter is where trends emerge before they hit the mass market. Look for design influencers posting "Work in Progress" shots.
- The Gap Strategy: Read the comments. If an influencer posts a complex interaction and 50 people ask "Is there a remix link?" and the answer is "No," you have found a gap. Build the "remixable" version of that trending aesthetic.
- The Complaint Strategy: Search for "Framer" + "annoying" or "Framer" + "wish." These emotional outbursts often highlight features that native Framer tools handle poorly, which you can solve with a clever component override or layout.
3. Competitor Teardowns (Differentiation)
Find the top 3 component libraries currently dominating the market. Do not copy them. Instead, look for their "Reviews" or specific product comments.
- What are users complaining about? (e.g., "The code overrides are too hard to customize.")
- What is missing? (e.g., "Great visual components, but no marketing sections.")
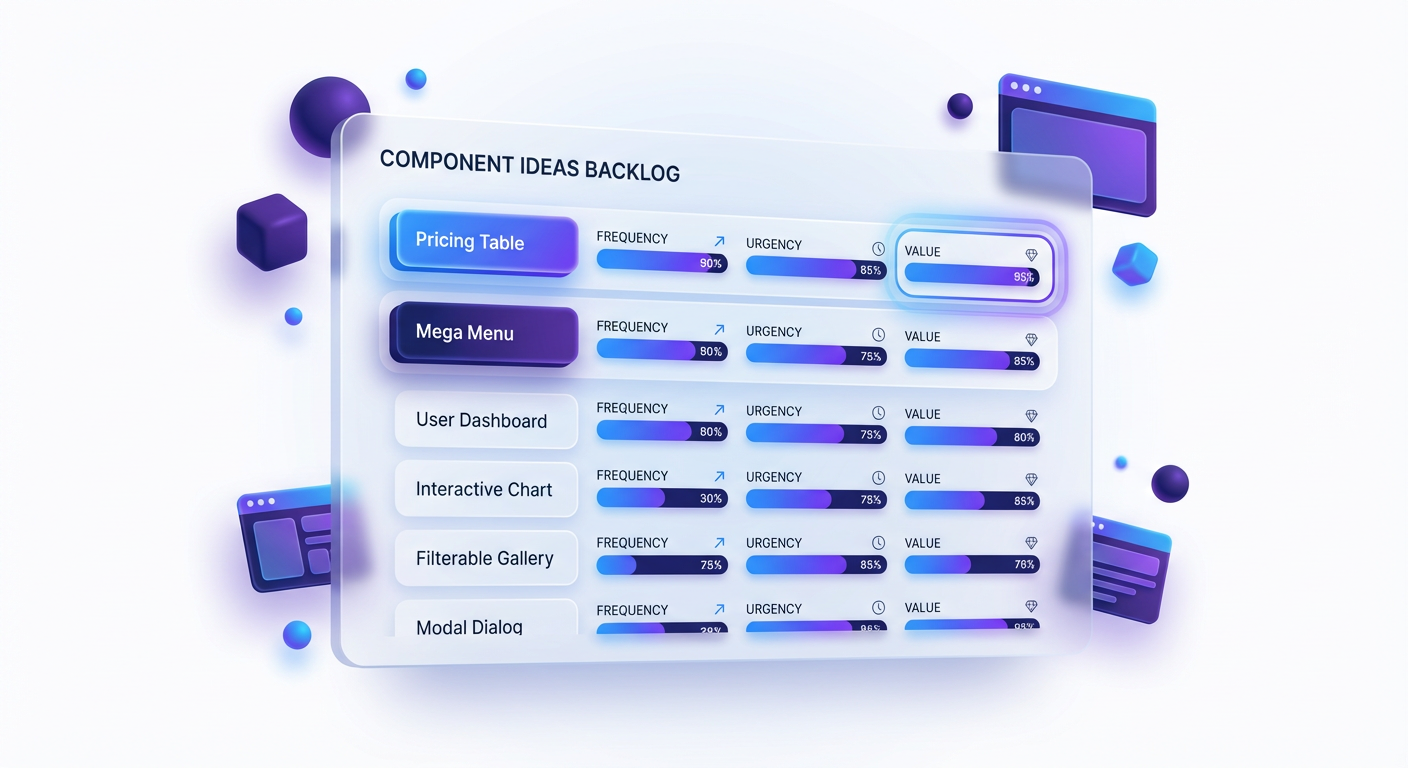
The Component Scoring Model
After three days of research, you should have a messy spreadsheet with 50-100 ideas. You cannot build them all. You need to filter these down to the top 5-10 ideas that will generate your initial revenue.
We use the FUWD Scoring Model. Rate each component idea on a scale of 1-5 for these four factors:
- Frequency (F): How often did you see this request? (1 = Once, 5 = Weekly/Daily)
- Urgency (U): How critical is this to the user's project launch? (1 = Nice to have, 5 = Project blocker)
- Willingness to Pay (W): Is this for a hobbyist or a business? (1 = Student portfolio, 5 = SaaS/Agency site)
- Differentiation (D): How many decent free alternatives exist? (1 = Flooded market, 5 = Zero good options)
Key Insight: Most designers make the mistake of building for "Frequency" (e.g., a Portfolio Template). While frequently requested, the willingness to pay is low because the audience is other designers with no budget. Aim for High Urgency + High Willingness to Pay.
The Winning Formula:
- Bad Idea: "Minimalist Blog Template" (Score: 12/20) - Saturated, low urgency.
- Good Idea: "SaaS Pricing Table with Toggle & Tooltips" (Score: 18/20) - High business value, hard to build from scratch.
Defining Your Positioning Wedge
You are entering a market with established players. If you launch a generic "Ultimate Framer Library," you will fail. You need a "Wedge"--a narrow entry point where you can be the absolute best option.
Your Wedge is defined by your Ideal Customer Profile (ICP).
Instead of targeting "Framer Users," narrow it down:
- Broad: Framer Users.
- Better: Freelance Designers.
- Best (The Wedge): Freelance Designers building high-converting landing pages for B2B SaaS startups.
When you narrow your focus, your product roadmap clarifies itself. If you are targeting B2B SaaS designers, you don't need to build a "Restaurant Menu" component. You need to build "Testimonial Grids," "Logo Carousels," and "Pricing Calculators."
Your Action Item: By the end of this week, you must fill out your Demand Matrix.
- List 30 raw ideas from community research.
- Apply the FUWD score to all of them.
- Select the top 3 component groups.
- Write a one-sentence positioning statement: "I am building a [Component Type] library for [Specific ICP] who struggle with [Specific Pain Point]."
Moving From Research to Revenue
You now have a validated list of ideas. The fear of "building something nobody wants" should be gone, replaced by the anxiety of "how do I actually execute this correctly?"
This is where the real work begins. Having a good idea is 10% of the equation; the other 90% is the execution, packaging, and launch strategy.
What You'll Build On:
- In Section 3 (The Build): We will take your top-ranked idea and enter the "Production Sprint." You will learn how to structure your Figma-to-Framer workflow so you can ship 5x faster than the average designer.
- In Section 4 (Pricing & Licensing): We'll tackle the math. How do you price a component versus a full template? We'll look at tiered pricing models that maximize Average Order Value (AOV).
- In Section 5 (The Launch): We will build your pre-launch email sequence. You'll learn how to warm up an audience even if you have zero followers right now.
The full course covers the advanced mechanics of running a digital product business. We dive deep into the technical nuances of component variants that scale, how to set up Lemon Squeezy for automatic license delivery, and the specific Twitter thread frameworks that drive traffic. We also explore "The Upsell Ladder"--how to turn a $29 component buyer into a $500/year subscriber.
You have your research. You know the gap exists. Now, let's build the product that fills it.
Course Details
- Sections8 sections
- Price$9.99