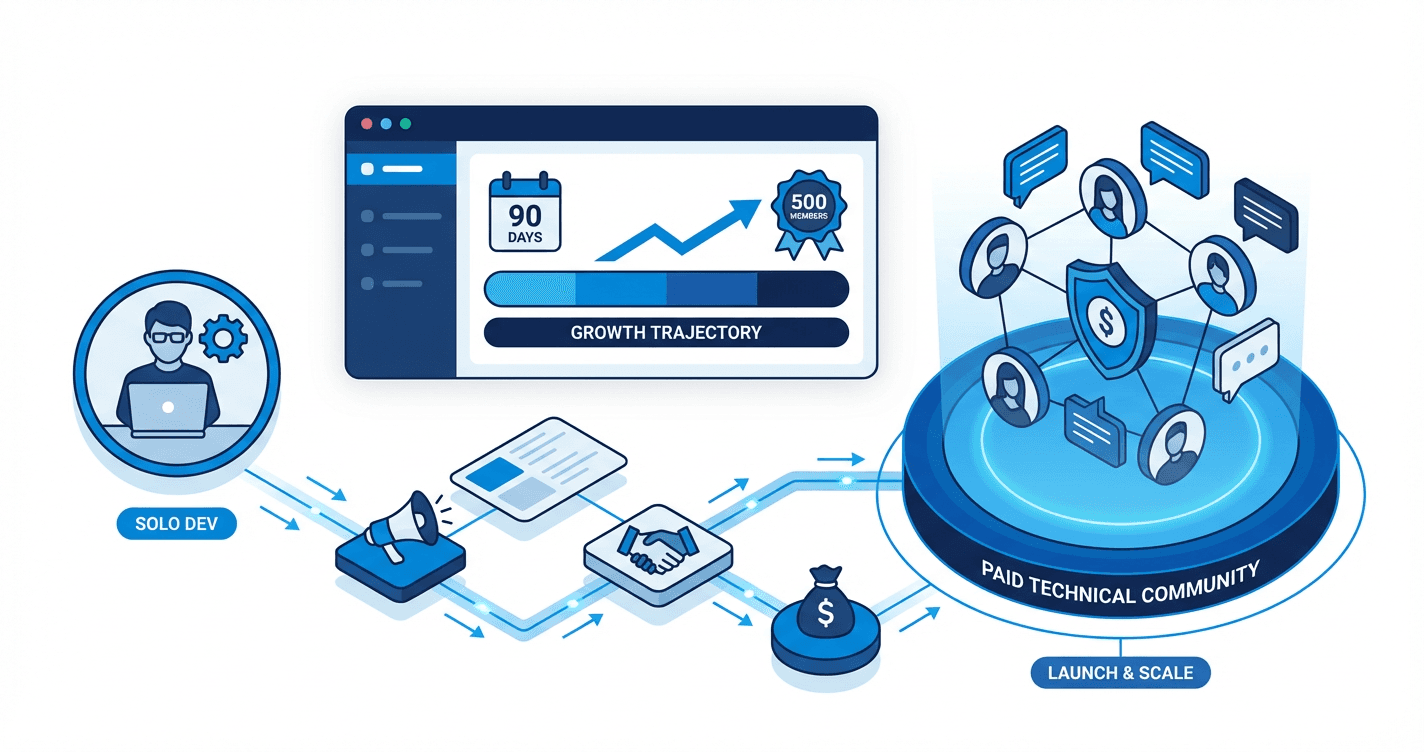
From Solo Dev to Paid Community Builder: Launch a 500-Member Technical Community in 90 Days
Launch and monetize a paid technical community in 90 days without quitting your day job. You'll use a sprint-based, developer-friendly playbook to validate a niche, ship a conversion-focused membership offer, set up Discord/Circle infrastructure, run retention-first programming, and build a content flywheel that reliably grows to 500 members and $2K-$5K MRR.
You have the technical chops and the Twitter followers, but your expertise is still locked inside a 9-to-5 while other devs are pulling in $5K/month from paid communities. The difference isn't that they know more than you--they just followed a repeatable system to package their knowledge, attract the right members, and build something that pays them while they sleep. In 90 days, you could have 500 paying members and a proven escape route from trading your time for someone else's money.
What Students Say
Hear from learners who have completed this course:
Adaeze O.
Developer Advocate (FinTech)
I came in with a vague idea for a “payments engineers” community and a half-used Discord. Section 1 (Niche Selection + Market Validation) forced me to run the 10-interview sprint and actually quantify pain points—turns out people didn’t want generic career chat; they wanted weekly “incident postmortems” and compliance checklists. Section 2 helped me package that into two tiers (Starter + Pro) with a clear outcomes-based promise, and the pricing framework gave me the confidence to charge $29/$79 instead of $10. Using Section 5’s landing page + waitlist sequence, I went from 0 to 312 waitlist signups in 3 weeks, then converted 68 paid members on launch week. I’m at $3.4K MRR now, and my onboarding from Section 6 cut first-30-day churn from ~18% (my initial beta) to 6% by adding a 7-day “setup sprint,” a buddy system, and a weekly office-hour format. This is the first side project that feels like a system instead of luck.
Read more
Tomás R.
Senior Backend Engineer (B2B SaaS)
I’m a backend dev, not a marketer, so I needed something operational. The sprint cadence was exactly how I work. Section 3 walked me through setting up Circle with role-based spaces, and the Stripe payment + access automation checklist saved me days of duct-taping. The big win was Section 4’s content flywheel: I built a repeatable loop where one deep-dive “Architecture teardown” becomes a newsletter, two LinkedIn posts, and a community workshop. That distribution system is why I’m not constantly scrambling for ideas. After implementing Section 7’s partnership playbook, I did two co-hosted events with niche tooling companies and got 147 new members in a month. In 90 days I reached 521 total members with 103 paid at $39/month ($4K+ MRR). The course didn’t just tell me to “create content”—it gave me templates for the editorial calendar, event formats, and the exact metrics to track weekly.
Read more
Fatima A.
Security Consultant & Trainer (AppSec)
I was already teaching AppSec workshops, but I couldn’t turn it into recurring revenue. Section 2 (Offer Architecture) helped me turn my training into a membership with a clear core promise: “ship one security improvement per week.” I used the pricing module to introduce an annual plan and a team add-on, which instantly made the revenue less fragile. Section 6 (Retention by Design) was the game-changer—especially the onboarding sequence and programming cadence. I implemented the ‘30-minute wins’ onboarding, weekly vuln-review clinics, and a monthly ‘Secure Your Stack’ challenge. Engagement went from a few lurkers to consistent participation; my weekly active rate is ~55% now. By Day 90 I had 214 paid members (mix of monthly and annual) and two small teams on the add-on, landing at about $2.6K MRR. This also improved my consulting pipeline: three clients hired me directly after attending the Section 5-style launch webinar + Q&A. The course made the community feel like a product I can run alongside client work without burning out.
Read more
Course Overview
Launch and monetize a paid technical community in 90 days without quitting your day job. You'll use a sprint-based, developer-friendly playbook to validate a niche, ship a conversion-focused membership offer, set up Discord/Circle infrastructure, run retention-first programming, and build a content flywheel that reliably grows to 500 members and $2K-$5K MRR.
Section 1: Niche Selection and Market Validation (Days 1-7)
Define a technical niche that's underserved but monetizable, then validate demand with lightweight experiments before you build anything. You'll turn your expertise into a clear positioning statement and a waitlist that proves intent.
Learning Outcomes:
- Identify and score community niches using a repeatable validation rubric (pain intensity, willingness to pay, reachability, competition).
- Write a precise positioning statement and "who this is for/not for" filter that increases conversions.
- Run a 7-day validation sprint (interviews, problem posts, waitlist) and interpret the results to decide go/no-go.
Most developers approach building a community the same way they approach a side project: they write the code first. They set up the Discord server, configure the bots, design the logo, and meticulously organize channels before verifying if anyone actually wants to join.
In engineering terms, this is premature optimization. It is the equivalent of scaling a database for a million users before you have acquired your first ten.
The first seven days of this course are designed to act as your unit tests. Before we commit resources to infrastructure, we must validate the inputs. We are going to identify a niche that is not just "interesting," but one that has high pain intensity and high willingness to pay.
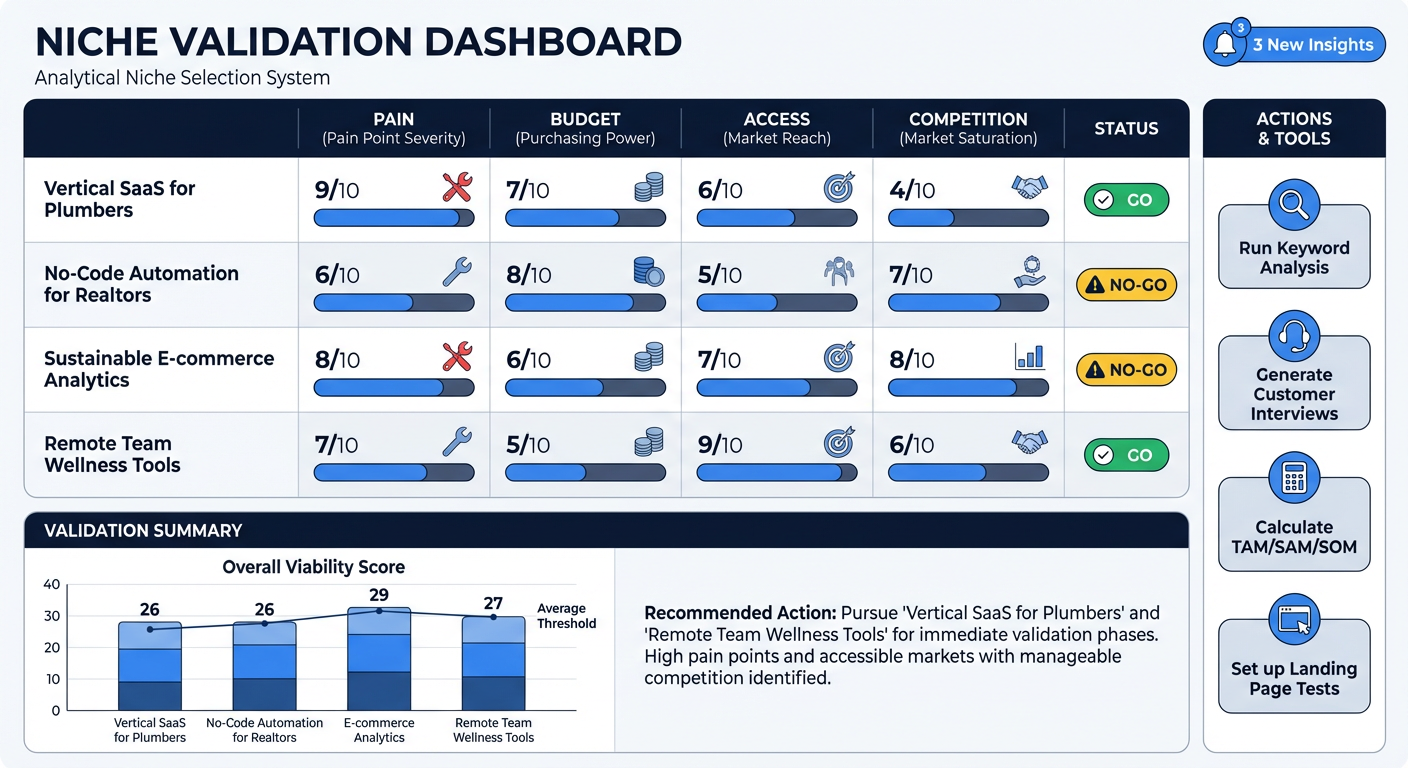
The Niche Scoring Matrix (Days 1-2)
Many developers fail because they target audiences with no money (e.g., "Computer Science Students") or audiences that are too broad to target effectively (e.g., "JavaScript Developers"). To replace a salary of $80k-$180k, you need an audience that views your community as an investment, not a cost.
We evaluate potential niches using a weighted scoring matrix (1-5 scale). You should list 3 potential ideas based on your expertise and run them through this compiler:
| Criterion | Definition | Why It Matters |
|---|---|---|
| Pain Intensity | Is the problem urgent? Does it block their work or career growth? | People pay to solve pain, not for "nice-to-haves." |
| Purchasing Power | Does this demographic have disposable income or a corporate budget? | Senior devs/managers can expense $50/mo; students cannot. |
| Reachability | Can you find 100 of these people on Twitter/LinkedIn within 1 hour? | If you can't find them, you can't sell to them. |
| Technical Moat | Does this require specific, hard-to-fake expertise? | Protects you from generic, non-technical copycats. |
Key Insight: A niche like "Junior Web Devs" scores high on Pain but low on Purchasing Power. A niche like "Staff Engineers transitioning to Management" scores high on Purchasing Power and Pain, making it a viable candidate for a high-ticket community.
The Action Step: Select the niche with the highest aggregate score. This is your hypothesis.
Defining Your API Contract: The Positioning Statement (Days 3-4)
Once you have your niche, you need a positioning statement. Think of this as the API documentation for your community. It tells the potential member exactly what inputs are required (who they are) and what outputs they can expect (the value).
Vague positioning is the number one cause of conversion latency. "A community for coders" is noise. "A community for Rust developers building high-frequency trading systems" is a signal.
Use this constructor format for your positioning:
I help [Specific Role]
who are struggling with [Specific Technical Pain Point]
to achieve [Desirable Outcome]
via [Mechanism/Community Type].
Example:
- Bad: "I help developers learn backend engineering."
- Good: "I help Senior Frontend Engineers who are struggling to break into full-stack roles to master System Design and AWS via a cohort-based practice community."
The "Who This Is Not For" Filter
Equally important is defining your exclusions. High-value communities derive value from the quality of the peer group. If you let everyone in, the signal-to-noise ratio drops, and your senior members churn.
Explicitly state on your landing page:
- This is NOT for absolute beginners.
- This is NOT for people looking for quick freelance gigs.
- This is NOT for passive observers.
Pro Tip: Being exclusionary actually increases conversion rates among your target demographic. It signals to the senior engineer that they won't be answering "how do I center a div" questions all day.
The 7-Day Validation Sprint (Days 5-7)
Now we run the integration test. Do not build the community yet. Do not set up Stripe. Your goal is to generate intent data.
We will execute a "Smoke Test" using a simple funnel:
- High-Intent Content (The Problem Post)
- Waitlist Landing Page (The Capture)
- Direct Outreach (The Verification)
Step 1: The Problem Post
Write a thread on X (Twitter) or a post on LinkedIn/Dev.to that articulates the specific pain point you identified in the matrix. Do not sell the solution yet--just validate the problem.
Structure:
- Hook: State the hard technical truth or unpopular opinion.
- Body: Agitate the pain. Describe the consequences of not solving it (burnout, stagnation, technical debt).
- Call to Action (CTA): "I'm building a private group to solve this. Join the waitlist."
Step 2: The Waitlist Page
Use a tool like Carrd, Tally Forms, or Notion. You need minimal features. The page must include your Positioning Statement and a simple email capture form.
Required fields:
- Email Address.
- One qualification question (e.g., "What is your current stack?" or "Years of experience?"). This reinforces that the community is curated.
Step 3: Assessing the Logs (Go/No-Go Decision)
After 48-72 hours of promotion, look at your metrics. This is your dashboard for decision-making.
| Metric | Benchmark | Interpretation |
|---|---|---|
| Conversion Rate | < 5% | Fail. Your positioning is weak or the pain isn't intense enough. |
| Conversion Rate | 5% - 15% | Warning. Promising, but iterate on the "Hook." |
| Conversion Rate | > 15% | Pass. High intent. You have found a nerve. |
| Waitlist Size | < 20 leads | Fail. Your distribution channel (reachability) is too small. |
| Waitlist Size | 50+ leads | Pass. Sufficient volume to launch a Beta. |
Important: If you do not hit the "Pass" benchmarks, do not proceed to Week 2. It is cheaper to restart the validation cycle now than to spend three months building a community for nobody. Treat a failed validation as a successful debugging session--you caught the error before deployment.
Case Study: The "DevOps for Startups" Pivot
One of our beta students, Alex, initially wanted to build a community for "AWS Learners." He ran the validation sprint and got a 2% conversion rate. The market was saturated with free content.
He pivoted using the Matrix. He targeted "CTOs of Pre-Series A Startups" (High Purchasing Power) struggling with "Scaling Compliance & Security" (High Pain). He re-ran the positioning statement: "A private war room for founding engineers navigating SOC2 compliance."
Result: 28% conversion rate on the waitlist. He launched with 15 members paying $500/year, generating $7,500 in upfront revenue before creating a single channel.
Looking Ahead
By the end of Day 7, you should have a validated spec: a clear niche, a list of 50+ interested leads, and the confidence that you are solving a real problem.
In Section 2: Infrastructure and Technical Stack, we will stop treating community tools like toys and start treating them like production environments. We will cover how to select between Discord, Slack, and Circle based on your specific technical requirements, and how to automate the onboarding flow so you aren't manually inviting users at 2 AM.
Section 2: Offer Architecture and Pricing That Converts (Days 8-14)
Design a membership that people can justify paying for, with value tiers that map to real outcomes (not vague access). You'll create pricing, benefits, and constraints that are easy to explain and hard to compare.
Learning Outcomes:
- Build a tiered offer (Core, Pro, Sponsor) with explicit deliverables, boundaries, and expected member outcomes.
- Set pricing using a simple model tied to value, market norms, and capacity; avoid common underpricing traps.
- Draft copy for your membership promise, objection handling, and "why now" messaging using templates.
In Section 1, you validated your niche and confirmed that a specific segment of the market--likely frustrated developers or ambitious junior engineers--has a problem worth solving. You have your "user stories" defined. Now, we move to the architecture phase.
Most developers approach monetization the wrong way: they build a massive library of content (features) and then try to sell access to it. This creates a maintenance nightmare and low perceived value. Instead, you need to design your membership like a high-performance API: clients (members) send a request (payment/time) and receive a specific, deterministic response (outcome).
If you cannot articulate the input/output relationship of your community, you cannot price it effectively. This week, we are refactoring your offer from "access to a chat room" to "a system for career acceleration."
The "Outcomes-Based" Architecture
Your offer is not a collection of Slack channels; it is a transformation vehicle. When a Senior React Developer considers paying you, they aren't buying more noise in their notification center. They are buying a shortcut.
To architect an offer that converts, you must decouple your time from the value delivered. We do this by creating tiers based on Service Level Agreements (SLAs) rather than content volume.

The Two-Tier Model
For a solo founder with a full-time job, complex tier structures introduce technical debt. We recommend a simple boolean approach for launch: Core vs. Pro.
1. The Core Tier (The Documentation) This is your scalable, many-to-many layer. It runs asynchronously.
- Deliverable: Access to the curriculum, peer community, and archives.
- Outcome: "I have the resources to figure this out myself."
- Maintenance Load: Low. O(1) complexity.
2. The Pro Tier (The Enterprise Support) This is your high-touch, synchronous layer.
- Deliverable: Code reviews, monthly group coaching calls, resume audits.
- Outcome: "I have an expert verifying my work."
- Maintenance Load: High. O(n) complexity.
Key Insight: Do not offer "24/7 access to me" in any tier. That is a bug, not a feature. It leads to burnout within 30 days. Instead, offer "weekly office hours" or "guaranteed response within 48 hours on specific threads." Define your boundaries in the contract just like you would an API rate limit.
Pricing Logic: The Value Algorithm
Developers often suffer from "hourly rate" bias. You look at your salary, divide by 2,000 hours, and try to price your community based on the time you put in. This is a mistake. Pricing is based on the cost of the problem you are solving for the member.
If your community helps a mid-level engineer get promoted to Senior, that is worth $20k-$40k in immediate salary increase. Pricing your community at $10/month signals that your advice is low-value.
The 10% Rule
A strong heuristic for B2C technical education is to charge roughly 10% of the value you generate.
| Target Outcome | Estimated Value to Member | Recommended Price Point |
|---|---|---|
| Learning a new framework (e.g., Rust) | $2,000 (Freelance gig capability) | $200 one-time or $49/mo |
| Senior to Staff Engineer Promotion | $40,000 (Salary bump) | $1,000/yr or $199/mo |
| First Developer Job | $70,000 (New career) | $500 - $1,500 (Bootcamp competitor) |
The "Beta" Discount Strategy Since you are launching in 90 days, you need early adopters to debug the process. Use the "Founder's Rate" strategy.
- Set your goal price (e.g., $99/mo).
- Launch your Beta at 50% off ($49/mo) for the first 50 members only.
- Lock them in at that rate forever (grandfathering).
This creates genuine scarcity and rewards risk-takers without devaluing your long-term brand.
Drafting the "ReadMe" (Copywriting)
You don't need to be a marketer to write good copy; you just need to write good documentation. Your landing page is the ReadMe file for your product. It needs to explain what the package does, how to install it (join), and how to handle errors (objections).
1. The Promise (The Abstract)
State the specific transformation clearly. Avoid vague benefits like "networking."
- Bad: "Join a community of like-minded Python developers."
- Good: "The operating system for Python devs who want to break into Data Engineering in 6 months."
2. Handling Exceptions (Objections)
Your potential members are skeptical. They have bought courses they never finished. You must address these "known issues" upfront.
Common Objections & Refactors:
- Objection: "I don't have time."
- Refactor: "This is designed for 2 hours/week sprints. No 40-hour video libraries."
- Objection: "Is this just ChatGPT content?"
- Refactor: "Based on real-world production incidents, not theory."
3. The "Why Now" (Deployment Window)
Why should they commit code today? If there is no urgency, the ticket sits in the backlog forever.
Pro Tip: Use "Cohort-Based Urgency" even for evergreen communities. "The next onboarding sprint starts on Monday. Join now to get placed in a peer accountability group."
Implementation Sprint: Days 8-14
By the end of this week, you will have a pricing table and a Google Doc containing your full sales argument.
Days 8-9: Define Your Tiers Create a spreadsheet listing every potential deliverable (content, calls, community, tools). Assign a "Time Cost" to each. Group them into Core and Pro. If the Pro tier requires more than 4 hours of your time per week total, cut scope.
Days 10-11: Pricing Mathematics Calculate your "Freedom Number." If you need $4,000/mo to feel secure:
- At $50/mo, you need 80 members.
- At $100/mo, you need 40 members.
- Choose the price that makes the volume achievable based on your current audience size (validated in Section 1).
Days 12-14: Write the Sales Doc Do not build a website yet. Write a plain text document following the "ReadMe" structure above. Share this text with 3-5 peers from your target niche. Ask them: "Where did you stop reading? What claim didn't you believe?"
What You'll Build On
Looking Ahead:
In Section 3 (Tech Stack & Automation), we will take the tiered architecture you designed this week and implement it using no-code tools. You will learn how to gate the "Pro" content automatically so you don't have to manually manage permissions.
In Section 4 (The Content Engine), we will fill your "Core" tier with high-value assets that act as lead magnets, ensuring your "outcome" promises are met without you being online 24/7.
In Section 6 (Launch Sequence), we will use the "Founder's Rate" pricing strategy to execute a 5-day open cart event intended to hit that first $2K MRR milestone.
You have now defined the logic of your business. The offer is the kernel; everything else is just interface. In the full course, we provide the exact swipe files for the sales emails and the Notion templates for the member dashboard, but the strategic pricing work you did here is what ultimately determines if the system compiles or crashes.
Course Details
- Sections8 sections
- Price$9.99