From API Consumer to API Product: Build and Monetize Your First Developer Tool in 8 Weeks
Go from integrating other people's APIs to shipping and selling your own in 8 weeks. You'll build a production-grade REST API that solves a real developer pain point, then productize it with authentication, rate limiting, docs, billing, and a developer-focused go-to-market plan designed to get your first 50 paying customers.

You've integrated dozens of APIs for employers and clients, but every month you watch indie hackers half as technical as you ship products that actually make money. The gap isn't your coding skills--it's knowing how to architect for scale, price for developers, and get your first paying customers without feeling like a fraud. This is the structured 8-week path from "I could build that" to "I built that and it's generating revenue."
What Students Say
Hear from learners who have completed this course:
Tomás R.
DevOps Engineer (FinTech)
I’d built internal services before, but I’d never shipped something people would actually pay for. Section 1 forced me to validate a real pain point (CI failures due to flaky webhooks) and turn it into a clear API product instead of “yet another endpoint.” The biggest unlock was Section 5: rate limiting + usage tracking + multi-tenant architecture. I implemented per-tenant quotas with a simple usage ledger and it immediately stopped the "one customer can melt your infra" problem I was worried about. After Section 7, I rewrote my docs to be contract-first, added copy-pastable examples, and generated a tiny JS SDK. The difference was obvious: my time-to-first-success for new users dropped from ~45 minutes (lots of back-and-forth) to under 10 minutes. Post-launch (Section 8), I followed the onboarding funnel steps and reached 11 paying teams in the first month at $29–$99/mo. Not life-changing money yet, but it’s a real product with real retention, and I’m finally treating the API like a business.
Read more
Priya V.
Product Manager, Developer Platform (SaaS)
This course gave me the structure I wish I’d had the first time I tried to “monetize an API.” Section 2 (contracts, DX, standards) helped me translate vague stakeholder requests into a concrete API contract with predictable error shapes and versioning rules. That let engineering move faster because we stopped debating endpoints mid-sprint. The most practical part for my day job was Section 6 on billing and monetization. I used the tiered plan templates and usage-based pricing guidance to redesign our pricing from a single flat plan to three tiers tied to tracked usage. We also added an overage model with clear limits (which Section 5 made measurable). In the next quarter, expansion revenue from existing customers increased by 18% because teams could start small and scale without renegotiating. I also took the developer onboarding funnel ideas from Section 7 and implemented a “getting started” path with a single quickstart, an API key flow, and a measurable activation event. Support tickets tagged “docs confusion” dropped noticeably within two weeks.
Read more
Yuki T.
Freelance Full-Stack Developer (Indie Maker)
I’m usually on the consuming side of APIs, so building one that feels “professional” was intimidating. Section 3 made production-grade implementation feel doable: I followed the patterns for input validation, consistent error responses, and basic observability hooks. Then Section 4 (auth, API keys, security baselines) was the turning point—I implemented API-key auth, key rotation, and scoped access so I could safely onboard strangers. I built a small REST API that converts and normalizes messy CSV exports into clean JSON for analytics pipelines (a problem I kept seeing in client work). After adding rate limiting + usage tracking from Section 5, I could confidently offer a free tier without worrying about abuse. Section 8 helped me actually launch: I shipped with logs/alerts, a public status page, and a simple outreach plan. Concrete results: within 6 weeks of finishing, I had 53 signups, 17 active weekly users, and 9 paying customers on a $19/mo plan. More importantly, client projects got faster because I reuse my own tool—what used to be 2–3 hours of data cleanup per project is now ~20 minutes.
Read more
Course Overview
Go from integrating other people's APIs to shipping and selling your own in 8 weeks. You'll build a production-grade REST API that solves a real developer pain point, then productize it with authentication, rate limiting, docs, billing, and a developer-focused go-to-market plan designed to get your first 50 paying customers.
Section 1: Validate the Problem and Define the API Product
You'll choose a narrow, painful developer problem worth paying for, define the core use case, and translate it into an API-first product spec with clear scope that fits an 8-week build.
Learning Outcomes:
- Identify high-signal developer pain points and validate demand using lightweight research (communities, search intent, competitor gaps)
- Write an API product brief: target user, job-to-be-done, MVP endpoints, pricing hypothesis, and success metrics
- Define a launchable scope with an "MVP now, roadmap later" plan to avoid overbuilding
The biggest lie developers tell themselves is, "If I build it, they will come."
You have likely spent years honing your craft. You understand the nuances of RESTful architecture, you know how to optimize database queries, and you can spin up a Docker container in your sleep. But in the world of API products, technical competence is merely the price of admission. The graveyard of side projects is filled with beautifully written code that solved problems nobody actually had.
To transition from an employee executing someone else's vision to a founder generating recurring revenue, you must flip your operating model. You are no longer just writing code; you are engineering a solution to a specific, painful problem.

This section is the foundation of your 8-week journey. We will resist the urge to open our IDEs immediately. Instead, we will validate that what we are about to build is worth your time and, more importantly, worth another developer's money.
The Anatomy of a High-Signal Problem
Successful API products don't usually start with a "cool idea." They start with a groan of frustration. Your goal is to identify a process that is currently manual, expensive, or technically difficult for developers, and wrap it in a clean, documented HTTP request.
When searching for ideas, you need to filter for High Signal indicators. These are signs that a budget already exists for the solution.
| Feature | Low Signal (Avoid) | High Signal (Pursue) |
|---|---|---|
| Origin Story | "I wanted to try this new tech stack." | "I saw 10 people on Reddit asking for this specific fix." |
| Problem Type | "It would be nice to have." | "This blocks me from shipping my product." |
| Current Solution | None (might mean no demand). | Patchwork scripts, expensive enterprise tools, or manual labor. |
| Willingness to Pay | Users expect it to be open source. | Users are losing money/time by not having it. |
Key Insight: Competition is actually a good sign. If you find an API that does what you want to do, but it costs $5,000/month for enterprise access, that is a validated market gap. Your opportunity lies in "unbundling" that feature for the mid-market developer.
Validation via Lightweight Research
You do not need to hire a focus group. As a developer targeting other developers, you have a unique advantage: you know where your customers live. We will use three methods to validate demand in under 48 hours.
1. Search Intent Analysis
Use tools like Ahrefs (free webmaster tools), Ubersuggest, or simply Google Autocomplete to find what developers are typing. Look for modifiers like "API for...", "convert X to Y programmatic," or "scrape [site] data."
- Example: A search volume of 500/month for "PDF to JSON API" indicates a steady stream of developers looking for a solution. It is niche enough to avoid fighting Google, but large enough to support a profitable side project.
2. Community Extraction
Go to Stack Overflow, Reddit (r/webdev, r/SaaS), and GitHub Issues. You are looking for threads with high engagement but unsatisfactory answers. Look for phrases like:
- "Is there a library for..."
- "Why is [Competitor API] so expensive?"
- "I'm tired of maintaining this script."
3. The "Manual Concierge" Test
Before writing a single line of backend logic, see if you can solve the problem manually. If your idea is an API that converts Figma designs to React code, offer to do it manually for five people on Twitter. If nobody wants it for free, they certainly won't pay for the API.
Pro Tip: Don't ask, "Would you use this?" That invites polite, false positives. Ask, "How much are you currently spending to solve this problem?" If the answer is "nothing" or "I don't really solve it," move on.
Writing the API Product Brief
Once you have identified the problem, you need to define the solution. This is not a technical spec for your database schema; it is a product spec for your customer. We use the Job-to-be-Done (JTBD) framework to keep the scope tight.
Your Product Brief should fit on a single page and include:
- Target User: (e.g., "Frontend developers building e-commerce sites")
- The Job: (e.g., "Validate VAT numbers in real-time to prevent shipping errors")
- The Pain: (e.g., "Current solutions are government portals that crash or enterprise APIs costing $500/min")
- The MVP Endpoint: The single most important HTTP request you will build first.
Example: The "Screenshot-as-a-Service" Brief
# Product: SnapAPI

**Target User:** Indie hackers and marketers building directories.
**Problem:** Taking programmatic screenshots of websites requires running Headless Chrome, which is memory-heavy and hard to scale on AWS Lambda.

**Core Value Proposition:** One API call to get a high-res image of any URL. No server management.

**MVP Endpoint:**
GET /v1/capture?url={target_url}&width=1280

**Success Metric:**
- < 2000ms latency
- 99.9% uptime (handling timeouts gracefully)

**Pricing Hypothesis:**
- Freemium: 100 calls/month free
- Pro: $19/month for 10,000 calls (simpler than managing their own Puppeteer cluster).
Defining Scope: MVP Now, Roadmap Later
The greatest risk to your 8-week timeline is "Scope Creep." As technical people, we love to optimize. We think, "I need rate limiting, and team accounts, and webhook notifications, and GraphQL support..."
Stop.
For an MVP (Minimum Viable Product), you need to build the "Steel Thread." This is the thinnest possible thread that connects a user's problem to a solved state.
The 8-Week Scope Rules:
- One Core Feature: If your API does image processing, do resize or crop, not both, for launch.
- One Auth Method: Start with simple API Keys. OAuth2 and SSO are for version 2.0.
- Simple Billing: Use a flat monthly subscription or a simple prepaid credit system. Complex metered billing can take weeks to implement correctly.
Important: Your first version is not optimized for scale; it is optimized for sales. It is better to have a server that crashes because you have too many paying customers than a perfectly scalable architecture with zero users.
Moving Forward
By the end of this week, you should have a documented Product Brief. You should know exactly who you are building for and have a "no-go" list of features you will not build in the first sprint.
You have validated the problem. Now, we need to build the machine.
Coming up in Section 2: Designing a Production-Ready API Architecture. We will move from strategy to engineering. We will select our stack (Node vs. Python vs. Go), set up a repository structure that supports rapid iteration, and design the OpenAPI specification that will serve as our contract. We will also make the critical decision: Serverless functions or containerized services?
Section 2: API Design That Developers Love (Contracts, DX, and Standards)
You'll design your API like a product: consistent resources, predictable errors, versioning strategy, and an OpenAPI contract that drives implementation, testing, and documentation.
Learning Outcomes:
- Design REST resources, naming conventions, pagination/filtering, idempotency, and error models that reduce support burden
- Create an OpenAPI 3.x specification and use it as the single source of truth for docs, SDKs, and test cases
- Apply practical versioning and compatibility strategies (URL vs header versioning, deprecation policy, changelogs)
When you build an internal API for a specific frontend, you have the luxury of context. If you change a response schema, you can walk over to the frontend developer's desk (or Slack channel) and tell them to update their types. You are building a pipe to move data from point A to point B.
But when you build an API product, you are building a user interface for developers. You have no control over how, when, or where your consumers will implement your code. You cannot tap them on the shoulder when you want to change a field name.
In this section, we transition from determining what to build (Section 1) to defining how it interacts with the world. We will move beyond "making it work" to designing a Developer Experience (DX) that reduces integration friction and support tickets.
The Contract-First Philosophy
Many developers start by defining their database models, then writing controller logic, and finally slapping some documentation on top. This is code-first development. For an API product, this is backward.
To build a product that scales, you should adopt a contract-first approach. This means defining your API specification (using OpenAPI 3.x) before writing a single line of backend logic.
Key Insight: Your API specification is the single source of truth. It drives your documentation, your validation logic, and even the SDKs you will generate later. If the code and the spec disagree, the code is wrong.
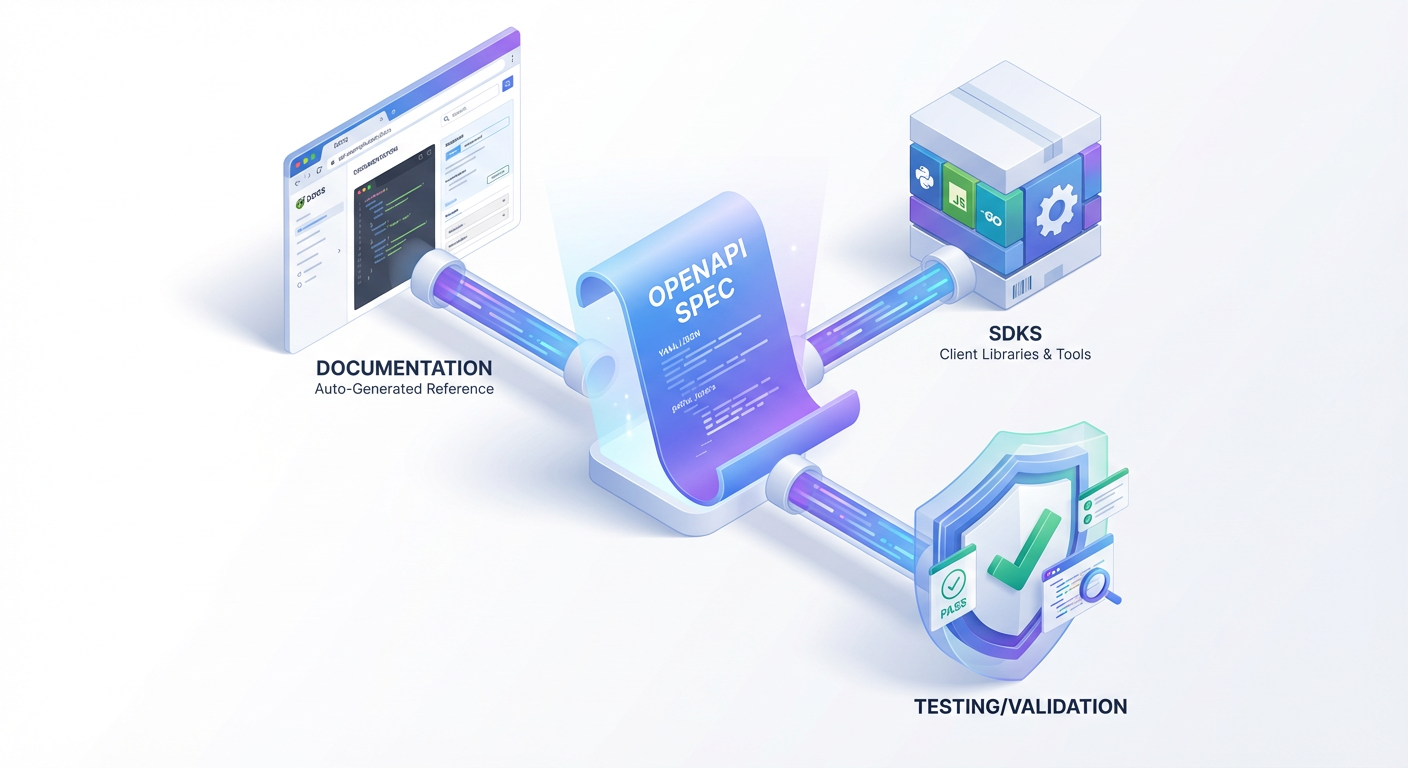
Using OpenAPI (formerly Swagger) allows you to:
- Mock servers immediately: You can give early access partners a mock server to test against while you build the backend.
- Automate validation: Libraries in Node, Python, and Go can ingest your OpenAPI spec and automatically reject requests that don't match the schema, saving you from writing boilerplate validation code.
- Generate documentation: Tools like Redoc or Swagger UI turn your YAML file into beautiful, interactive documentation.
Here is an example of how a well-structured OpenAPI component definition looks for a product resource. Notice the explicit data typing and descriptions--these will populate your final documentation.
components:
  schemas:
    Invoice:
      type: object
      required:
        - id
        - amount
        - currency
        - status
      properties:
        id:
          type: string
          format: uuid
          description: The unique identifier for the invoice.
        amount:
          type: integer
          description: Amount in smallest currency unit (e.g., cents).
        currency:
          type: string
          minLength: 3
          maxLength: 3
          example: USD
        status:
          type: string
          enum: [draft, open, paid, void]
          description: The current lifecycle state of the invoice.
Predictability Over Creativity
When a developer integrates your API, they are looking for patterns. If your GET /users endpoint returns a list in a data array, but your GET /invoices endpoint returns the list at the root level, you have broken the developer's trust.
Your goal is to be boringly predictable.
1. Resource Naming Stick to standard REST conventions. Use nouns, not verbs. Use plurals for collections.
- Avoid:
/api/getUsers,/api/createNewInvoice,/api/update-settings - Adopt:
GET /users,POST /invoices,PATCH /settings
2. Idempotency Network failures happen. If a developer sends a payment request and the connection times out, they need to know it's safe to retry without charging the customer twice. You should support Idempotency Keys.
This usually involves checking a custom header (e.g., Idempotency-Key) and caching the response of the initial request. If the client retries with the same key, return the cached response immediately without executing the logic again.
3. Pagination Strategies Never return an unbounded list of resources. You must force pagination. There are two primary strategies, and the choice depends on your use case.
| Feature | Offset-Based Pagination | Cursor-Based Pagination |
|---|---|---|
| Mechanism | ?limit=10&offset=50 | ?limit=10&starting_after=idx_123 |
| Pros | Easy to implement; allows jumping to specific pages. | Extremely performant at scale; handles real-time data ingestion well. |
| Cons | SQL performance degrades as offset increases; rows can be skipped or duplicated if data is added while paging. | Cannot jump to "Page 50"; URLs are not guessable. |
| Best For | Admin dashboards, static lists. | Social feeds, transaction logs, infinite scrolling. |
Pro Tip: For most modern API products, Cursor-based pagination is the superior choice. It prevents the "missing item" bug that occurs when a new item is inserted into the database while a user is paginating through a list.
Designing for Failure: The Error Model
The most visited part of your documentation will often be the "Errors" section. How you handle failure defines the developer experience. A generic 500 Internal Server Error is useless to a developer trying to debug their integration.
Your API should return a structured error object that provides machine-readable codes and human-readable context.
Bad Response:
HTTP/1.1 400 Bad Request
"Invalid input"
Good Response:
HTTP/1.1 400 Bad Request
{
  "error": {
    "code": "parameter_invalid",
    "message": "The currency 'USDD' is not supported.",
    "param": "currency",
    "doc_url": "https://docs.your-api.com/errors#currency-codes"
  }
}
By providing a doc_url and a specific code, you allow the developer to self-diagnose the issue without contacting you. This reduces your support burden and increases their conversion rate from "trying out" to "integrated."
Versioning: The Promise of Stability
When you publish an API, you are making a promise: "If you write code against this today, it will still work tomorrow."
Eventually, you will need to make breaking changes. You must have a strategy for this from Day 1. There are two common approaches:
- URL Versioning:
https://api.yourproduct.com/v1/invoices - Header Versioning:
Accept: application/vnd.yourproduct.v1+json
For most indie API products, URL versioning is preferred. It is explicit, visible, and easy for developers to understand at a glance.
Important: Never overwrite a version. If you need to rename a field that breaks backward compatibility, that is
v2. If you are simply adding a new field, that is a non-breaking change and can stay inv1.
A Note on Implementation
While we are focusing on design here, these decisions dictate your implementation. When we move to the coding phase, you will not be guessing what endpoints to write. You will simply be fulfilling the contract you have just written in your OpenAPI spec. This separation of "Design" and "Build" is what allows solo founders to ship production-grade software that feels like it was built by a large team.
What You'll Build On
This section established the "Contract" of your product. In the full course, we use this foundation to implement the critical infrastructure that turns a standard API into a business:
- Section 3 (Security): We will implement API Key authentication and Role-Based Access Control (RBAC) that protects the resources you just designed.
- Section 4 (Rate Limiting): You will learn to protect your endpoints using Redis to implement sliding-window rate limits, preventing abuse and managing tiers.
- Section 5 (Monetization): We will map these resources directly to Stripe products, implementing metered billing based on the usage patterns defined in your contract.
- Section 6 (SDKs): We will use the OpenAPI spec created here to auto-generate client libraries in Python and JavaScript, drastically lowering the barrier to entry for your customers.
By mastering API design standards now, you are ensuring that the advanced business logic we implement in the upcoming sections has a solid, scalable architecture to rest upon. Next, we start writing the code that enforces these contracts.
Course Details
- Sections8 sections
- Price$9.99